
Android Penetration Testing After Nougat
Since the introduction of Android Nougat, users no longer have the ability to add user or admin supplied CA certs without using a rooted device. Because of this, android penetration testing is effectively impossible without taking some necessary steps to proxy traffic to Burpsuite. This tutorial will provide instruction on how to bypass this restriction on later versions of Android while using Android Studio to conduct an effective mobile app penetration test.

First, you will need to download the latest version of Android Studio. Android Studio allows a user to run an emulated version of Android on various devices such as a Google Pixel right from their PC. Once downloaded, you can now set up your virtual Android device.
Android Studio Setup
The following steps will ensure you have a proper environment for Burpsuite to proxy the devices traffic. Make sure in Burpsuite you’ve configured the proxy to bind to “all interfaces”.
- Launch Android Studio
- Open the APK file you need to test
- Tools > AVD Manager > Create Virtual Device
- From “Select Hardware” > Phone: Pixel XL (or whatever you prefer)
- Next > Release Name: Marshmallow (this will start a download)
- Name the device > Finish
- Start the device by pressing the green triangle icon.
- With the emulated device now on your screen, click on the three dots (…) on the sidebar.
- Settings > Proxy
- Manual proxy configuration: Set hostname to your PC IP address and port number to what you have configured on Burpsuite.
- Hit apply and ensure proxy status says “Success”
Installing the Burpsuite CA Certificate
Android requires CA certificates to be in a specific format in order to be installed. For this, we’ll use openssl to convert the certificate.
- Download the certificate from Burpsuite
- Click the Proxy tab > Options
- Click Import / export CA certificate
- Save in DER format
- Copy the CA certificate to wherever you have openssl installed
- The following commands will convert the certificate from DER to PEM and then name it in the required Android convention.
openssl x509 -inform DER -in cacert.der -out cacert.pem
openssl x509 -inform PEM -subject_hash_old -in cacert.pem | head -1
mv burpcert.pem 9a5ba575.0
Going back to Android Studio, the installation will have installed ADB in order to run the device as root and perform the necessary steps to mount the filesystem to transfer the new certificate over to the device.
In a terminal:
Go to the following path:
C:\Users\<YourWindowsUser>\AppData\Local\Android\Sdk\emulator

List your AVD's (devices you've created) to get the exact name:
C:\Users\<YourWindowsUser>\AppData\Local\Android\Sdk\emulator\emulator.exe -list-avds

Run the AVD with writable system:
C:\Users\<YourWindowsUser>\AppData\Local\Android\Sdk\emulator\emulator.exe -avd Your_AVD_Name -writable-system -no-snapshot-load
Your emulated Android device should now be running. Leave that terminal open and open a new one or use the terminal within Android Studio.
Go to the following path:
C:\Users\<YourWindowsUser>\AppData\Local\Android\Sdk\platform-tools\

Run the following commands:
adb root
adb remount
adb push 9a5ba575.0 /system/etc/security/cacerts/
adb shell chmod 644 /system/etc/security/cacerts/9a5ba575.0
adb shell reboot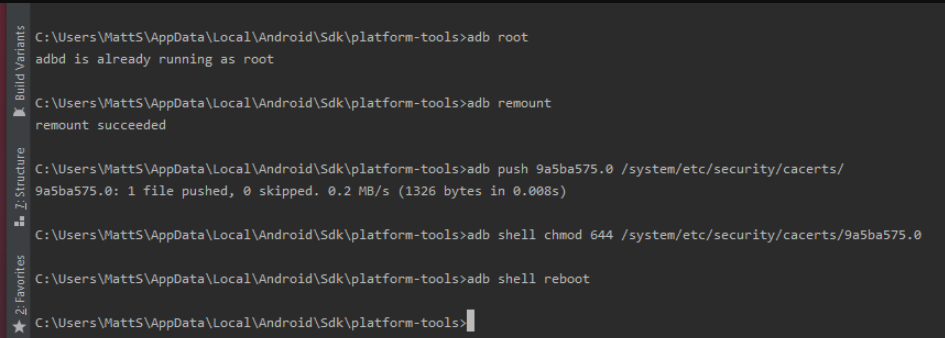
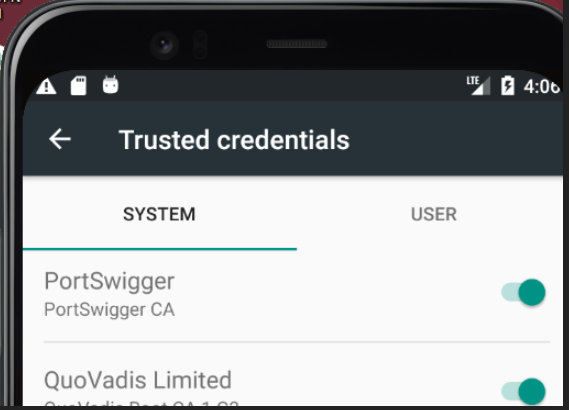
Now verify everything is working properly.
- On your emulated Android device
- Settings > Security >Trusted Credentials
- Look for Portswigger CA under SYSTEM certificates
- On Burpsuite
- Open the application you are conducting the penetration test on and verify traffic is now being received in Burpsuite by looking at your HTTP history
Android penetration testing should now be possible with traffic now being proxied to Burpsuite!